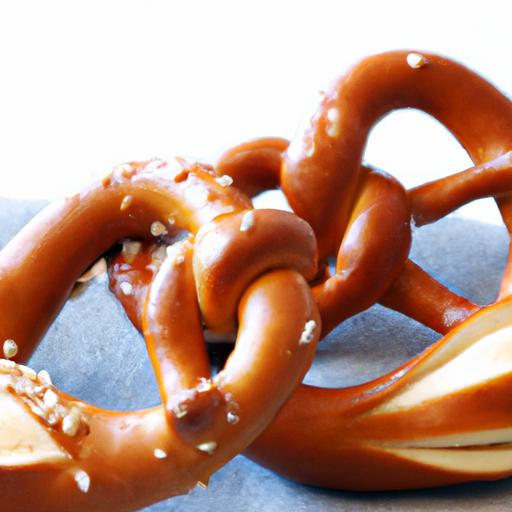
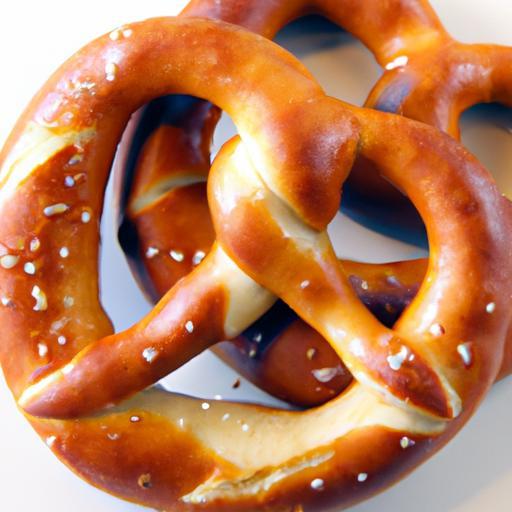
There’s something irresistibly warm and inviting about the golden embrace of a perfectly baked soft pretzel. With its tender, chewy interior and that signature glossy, salted crust, the soft pretzel is more than just a snack-it’s a timeless piece of edible art, steeped in tradition and flavor. Yet, beyond the bustling street corners and festive fairs, the true magic happens at home, where flour, water, and a little patience transform into twists of pure comfort. In this article, we’ll unravel the secrets behind “Twist & Taste: The Art of Homemade Soft Pretzels,” guiding you through the step-by-step craft of creating these iconic treats from scratch. Prepare too roll up your sleeves and infuse your kitchen with the rich aromas and satisfying textures that only fresh, homemade soft pretzels can deliver.
Twist & Taste: the Art of Homemade Soft Pretzels brings an irresistible allure to any kitchen, inviting bakers of all levels to explore the magic behind tender, perfectly twisted dough and that golden, chewy crust we all crave. Rooted in centuries-old German tradition, soft pretzels evoke cozy afternoons and festive gatherings, rewarded only by their signature taste and texture achieved through mindful crafting and simple techniques.
Prep and Cook time
- Preparation: 20 minutes
- Rise Time: 1 hour 15 minutes
- Baking: 15 minutes
- total: Approximately 1 hour 50 minutes
Yield
Enjoy 8 large soft pretzels, perfect for sharing or savoring throughout the week.
Difficulty Level
Medium: Ideal for adventurous beginners and confident home bakers alike.
Ingredients
- 1 ½ cups warm water (110°F/43°C)
- 1 packet (2 ¼ teaspoons) active dry yeast
- 1 tablespoon granulated sugar
- 4 cups all-purpose flour, sifted
- 2 teaspoons kosher salt
- 4 tablespoons unsalted butter, melted and slightly cooled
- 8 cups water
- ½ cup baking soda
- Coarse sea salt, for sprinkling
- Optional toppings: melted butter, cinnamon sugar, garlic salt, shredded cheddar cheese, or everything bagel seasoning
Instructions
- Activate the yeast. In a large bowl, whisk warm water, yeast, and sugar. Let sit until foamy, about 5 minutes, indicating yeast is alive and ready.
- Mix the dough. Add sifted flour, salt, and melted butter to the yeast mixture. Stir with a wooden spoon until dough begins to come together.
- Knead for softness. Transfer dough to a lightly floured surface; knead for 8-10 minutes until smooth and elastic.Adding a touch of flour for non-stick ensures the dough remains soft and pliable-not stiff.
- First rise. Place dough in a greased bowl, cover with a clean towel or plastic wrap, and let rise in a warm spot until doubled in size, approximately 1 hour.
- Prepare pretzel rods. Punch down risen dough gently and divide into 8 equal portions. Roll each into a 20-inch rope, aiming for consistent thickness for even baking.
- Master the twist. Shape each rope into the customary pretzel by forming a U-shape, crossing ends twice, and pressing tips firmly onto the bottom curve. This classic twist lends that iconic texture and uniform bake.
- Baking soda bath. Preheat the oven to 450°F (230°C). In a large pot,bring 8 cups of water and baking soda to a boil. Carefully dip each pretzel into the boiling bath for 30 seconds-this crucial step ensures a golden crust with a slight tang and deep, chewy bite.
- Drain and top. Place pretzels on parchment-lined baking sheets. While damp, sprinkle generously with coarse sea salt or other savory/sweet toppings for an immediate flavor upgrade.
- Bake to golden perfection. Bake pretzels 12-15 minutes until deep golden brown, rotating the pans halfway for even color and crunch.
- optional finishing touch. Brush fresh-from-oven pretzels with melted butter for a glossy sheen and extra richness. Let cool slightly before serving warm to capture that ultimate softness inside contrasting with irresistible chewiness outside.
tips for Success: Elevate Your Pretzel Experience
- Hydration Level: Achieving that perfect softness hinges on dough hydration-avoid adding too much flour during kneading to keep the crumb tender.
- Yeast Matters: Always check yeast freshness visually-if foam doesn’t form,your yeast might be expired and should be replaced for best rise.
- Rest the Dough: Allow adequate rise time; rushing this step results in dense pretzels lacking fluffiness.
- Experiment with Toppings: Don’t hesitate to try sweet options like cinnamon sugar tossed after butter brushing or savory mix-ins like za’atar or smoked paprika for unique twists.
- Make-Ahead Dough: For convenience, refrigerate dough overnight tightly wrapped, then shape and bake the next day, allowing flavors to mature beautifully.
Serving Suggestions
Serve your soft pretzels warm, paired with classic mustard dips or artisan cheese spreads to highlight their soft chew and golden crust. For a sweet touch, offer alongside rich chocolate sauce or vanilla glaze. Garnish with fresh herbs or flaky sea salt,arranging on rustic wooden boards or vibrant ceramic platters to showcase their inviting texture and trademark shape.

| Nutritional Info (per pretzel) | Amount |
|---|---|
| Calories | 220 kcal |
| Protein | 6 g |
| Carbohydrates | 43 g |
| Fat | 3 g |
Discover more baking inspiration with our Homemade Bread Recipes collection to expand your artisan skills. For a deeper understanding of dough chemistry and baking science, explore King Arthur Baking’s Guide to Dough Ingredients.
Q&A
Q&A: Twist & Taste – The Art of Homemade Soft Pretzels
Q1: what makes a soft pretzel different from a regular pretzel?
A: Soft pretzels are delightfully chewy with a tender crumb inside and a golden-brown, slightly crispy crust outside. Unlike their crunchy cousins, the hard pretzels, soft pretzels are baked fresh and frequently enough boiled briefly in a baking soda bath before baking to achieve that signature texture and deep mahogany color.
Q2: Why do you boil the dough before baking soft pretzels?
A: Boiling the dough in a baking soda solution is the secret ritual that transforms simple bread dough into a classic soft pretzel. This alkaline water bath gelatinizes the surface starches, which locks in moisture and creates that glossy, chewy crust once baked. It also adds to the rich, slightly tangy flavor unique to pretzels.
Q3: Can I customize my homemade soft pretzels with flavors or toppings?
A: absolutely! The canvas is yours. While traditional pretzels are sprinkled with coarse salt, you can get creative with everything from garlic and herb blends, sesame or poppy seeds, cinnamon sugar for a sweet twist, or even melted cheese draped over the top. Homemade means your pretzels can reflect your personality and palate.
Q4: What is the best dough consistency for perfect soft pretzels?
A: The dough should be soft and slightly tacky but not sticky. Achieving the right balance ensures it’s elastic enough to stretch and twist into shape without tearing, while retaining enough moisture for a fluffy interior once baked. Think of it as the dough’s way of smiling back at you-pliable and just right.
Q5: How long should I let the pretzels rise before baking?
A: A brief but essential pause-typically around 30 to 45 minutes-is enough for the shaped pretzels to puff slightly and develop subtle air pockets. This rise encourages a light, airy crumb while keeping the classic chewy bite that fans adore.
Q6: Is there a shortcut for making homemade soft pretzels?
A: While shortcuts can work, the magic lies in patience and technique.However, using active dry yeast that blooms quickly, warming your ingredients to cozy temperatures, and prepping your baking soda bath ahead can speed up the process without sacrificing flavor or texture.
Q7: What do soft pretzels pair well with?
A: The options are endless: classic mustard varieties-from spicy to honey-cheese dips,or even sweet companions like cream cheese frosting or chocolate sauce. For a heartier snack, try them alongside soups or salads. Each bite invites a new flavor journey.
Q8: Any tips for shaping perfect pretzel twists?
A: yes! Roll your dough ropes evenly, about 18-20 inches long, and aim for uniform thickness. When twisting, think gentle but deliberate-cross the ends over twice, then press the tips firmly onto the curve’s bottom to hold shape during baking. Practice makes perfect, and each twist becomes a little edible artwork.
Q9: Can soft pretzels be frozen?
A: Definitely. Freeze them after baking and cooling fully, wrapped well to prevent freezer burn. When ready to enjoy, simply thaw and warm them in the oven for a few minutes to revive that fresh-baked softness.
Q10: What’s the best way to store homemade soft pretzels?
A: Keep them in an airtight container at room temperature for up to two days. For longer freshness, freezing is the way to go. Avoid refrigerating pretzels, as it tends to dry them out and dull their signature chew.
Embrace the timeless ritual of twisting, boiling, and baking to create your very own batch of soft pretzels – where simple ingredients meet hands-on love and irresistible flavor. Happy twisting!
Final Thoughts
As the final golden twists slide from your oven, releasing that irresistible aroma of freshly baked dough and melted salt, you’ve not only crafted a snack-you’ve embraced a time-honored tradition that ties together craftsmanship, patience, and flavor.Homemade soft pretzels invite you to slow down, savor the process, and celebrate the joy found in simple ingredients transformed by skilled hands. Whether sprinkled with coarse salt, dipped in mustard, or enjoyed plain, each bite is a testament to the art of baking made personal.So next time you crave a warm, buttery twist, remember: the magic of soft pretzels lies not just in their taste, but in the hands that shape them. Happy twisting, and even happier tasting!