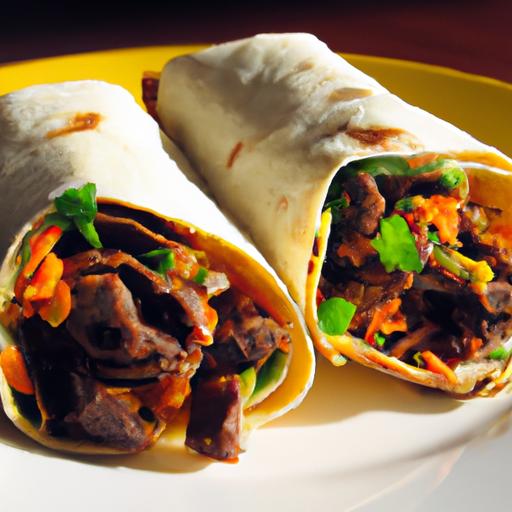
ThereS something undeniably comforting about melted cheese draping over savory beef, all tucked inside a warm, soft wrap. Welcome to the world of “Melted Magic: Easy cheesy Beef Wraps Recipe Unwrapped,” where simple ingredients transform into a symphony of flavors and textures that delight the senses. Whether you’re a busy weeknight cook craving a rapid fix or a foodie looking to indulge in a cheesy, meaty embrace, this recipe promises an effortless, mouthwatering experience. Get ready to unwrap the secrets behind creating the perfect cheesy beef wraps that will have everyone reaching for seconds-no culinary wizardry required, just pure, satisfying magic.
Melted Magic: Easy Cheesy Beef Wraps Recipe Unwrapped
Melted Magic: Easy Cheesy Beef Wraps Recipe Unwrapped brings together rich, savory beef with melty cheese wrapped in a tender, yet crispy embrace-transforming everyday ingredients into an unforgettable culinary delight. This recipe traces its roots to simple street food traditions but elevates the experience with a gourmet touch that’s bound to impress family and friends alike. Whether you’re craving comfort food or hosting a casual gathering, these wraps offer a perfect balance of texture and flavor that’s truly magical.
Prep and Cook Time
- Preparation: 15 minutes
- Cooking: 20 minutes
- Total: 35 minutes
Yield
Serves 4 generous portions (2 wraps each)
Difficulty Level
Easy – Perfect for home cooks of all skill levels looking to craft a quick yet impressive meal.
Ingredients
- 1 lb (450g) ground beef, preferably 85% lean for juicy flavor
- 1 cup shredded sharp cheddar cheese, for that signature melt and tang
- 1/2 cup diced onions, finely chopped
- 2 cloves garlic, minced
- 1 tsp smoked paprika, to add warmth and depth
- 1/2 tsp chili powder, mild heat that enhances the beef
- salt and freshly ground black pepper, to taste
- 4 large flour tortillas, 10-inch diameter, soft and flexible
- 2 tbsp olive oil, for sautéing and crisping the wraps
- Optional toppings: sliced jalapeños, fresh cilantro, diced tomatoes, sour cream, and guacamole
Crafting the Perfect Cheesy Beef Blend
Start by heating olive oil in a skillet over medium heat. Sauté the diced onions untill translucent and sweet, about 4 minutes. Add minced garlic and cook for another 30 seconds, releasing its aromatic essence. Introduce the ground beef, breaking it up with a wooden spoon, and sprinkle with smoked paprika, chili powder, salt, and pepper. Cook until the beef is browned and crumbly, approximately 8 minutes, stirring occasionally. Once the beef is cooked,gently fold in half of the shredded cheddar cheese,letting it melt slowly and bind the mixture into a rich,cheesy blend. This step is crucial-allowing the cheese to mingle while warm ensures every bite is packed with creamy texture and flavor.
Choosing the Ideal Wrap for Ultimate Flavor and Texture
When selecting your wrap, opt for soft, pliable flour tortillas around 10 inches across-these provide the perfect canvas for folding without tearing. for added layers of flavor, lightly warming the tortillas before assembling helps prevent breakage and enhances the wrap’s tenderness. Alternatively, for a gluten-free option or a nuttier profile, corn tortillas or whole wheat varieties work beautifully. the key is a wrap that can hold the gooey beef and cheese blend without becoming soggy or falling apart during cooking.
Step by Step Guide to Wrapping and Melting Your Masterpiece
- Lay out one tortilla on a clean, flat surface.
- Place a heaping ½ cup of the cheesy beef blend in the center, spreading it into a rectangular shape about ¾-inch thick, leaving space along the edges to fold.
- Sprinkle the remaining cheddar cheese over the beef layer for extra gooeyness upon melting.
- Fold in the shorter edges of the tortilla toward the center.
- Roll the wrap tightly from one long side to the other, creating a snug cylinder that locks in all ingredients.
- Heat a non-stick skillet over medium heat and brush lightly with olive oil.
- Place the wraps seam side down in the pan and cook for 3-4 minutes until the bottom is golden and crispy.
- Carefully flip the wrap and cook the other side for an additional 3-4 minutes, pressing gently with a spatula for even melting and browning.
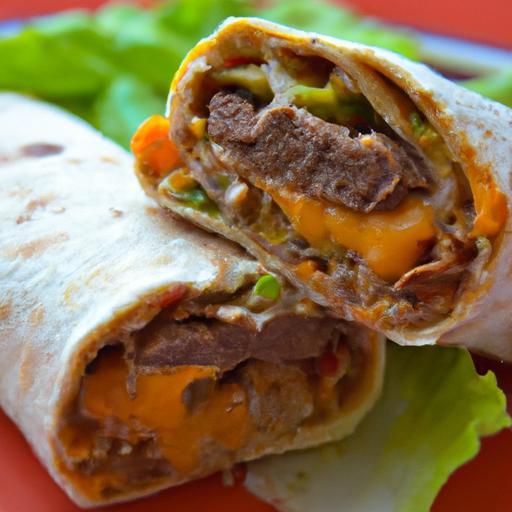
- Remove from heat and let rest for 1-2 minutes before slicing diagonally for visually appealing servings.
Tips and Tricks for Customized Toppings and Serving Suggestions
To elevate this dish, don’t hesitate to experiment with toppings. Fresh cilantro and diced tomatoes add brightness, while jalapeños bring a lively kick. A dollop of creamy sour cream or cool guacamole balances the richness perfectly. For crunch, sprinkle toasted pepitas or crushed tortilla chips on top. Serve with a side of smoky chipotle salsa or tangy pico de gallo for dipping. When plating, garnish with lemon wedges and a sprinkle of paprika to highlight the dish’s vibrant colors. This versatility lets you tailor each wrap to your mood and guests’ preferences, making your cheesy beef wraps not just a meal but a festive experience.
Chef’s Notes
- For a lighter twist, substitute half the beef with diced mushrooms or cooked black beans to keep the texture hearty but with less fat.
- If you prefer a different cheese, Monterey Jack or pepper jack introduce a milder or spicier profile, respectively.
- Make ahead: prepare the beef blend up to 2 days in advance and keep refrigerated-assemble and cook fresh to retain perfect wrap texture.
- To avoid soggy wraps,ensure the beef mixture is warm but not wet; drain excess liquid after cooking if necessary.
- Use a grill press or sandwich press if available to achieve a restaurant-quality crispness and perfect melt.
Serving Suggestions
Present your cheesy beef wraps on a rustic wooden board or brightly colored platter. Accompany with fresh side salads like a zesty lime-cilantro coleslaw or a crisp cucumber and tomato salad for refreshing contrast. Small bowls of salsa verde, creamy avocado crema, or tangy pickled onions invite guests to customize their bites. For a cozy dinner, serve alongside roasted sweet potato fries or smoky grilled corn for a hint of southern flair. The melting cheese oozing out against the spicy, savory beef makes each bite a party of texture and flavor.
| Nutrient | Amount per serving |
|---|---|
| Calories | 450 kcal |
| Protein | 28 g |
| Carbohydrates | 32 g |
| Fat | 22 g |
Related Recipe: Explore our Creamy Mexican Chicken Wraps for another delightful handheld meal.
For more on selecting the right tortillas and maintaining wrap integrity, visit Serious Eats’ in-depth guide on tortillas.

Q&A
Q&A: Melted Magic – easy cheesy Beef Wraps Recipe Unwrapped
Q1: What makes these Cheesy Beef wraps so special?
A: Its all about the melty, gooey cheese paired with seasoned, juicy beef wrapped in a soft tortilla hug. This recipe transforms everyday ingredients into a comforting,flavor-packed experience that feels like a warm culinary embrace.
Q2: How easy is this recipe for a busy weeknight?
A: Super easy! With just a handful of ingredients and under 30 minutes from start to finish, it’s perfect for anyone who wants tasty food without the hassle. Brown your beef, melt your cheese, assemble your wrap-done and tasty.
Q3: Can I customize the fillings?
A: Absolutely! The beauty of these wraps lies in their versatility.Add sautéed mushrooms, bell peppers, or even a dash of spicy salsa to ramp up the flavor. This recipe is a canvas-paint it with your favorite ingredients.
Q4: What kind of cheese works best?
A: Go for melty, flavorful cheeses like cheddar, Monterey Jack, or a blend of Mexican cheeses. They melt beautifully to create that irresistible ooey-gooey effect that makes the wraps magical.
Q5: Are these wraps kid-amiable?
A: Totally! Kids love the cheesy goodness and familiar beef flavor. Plus, the wraps are easy to handle-a perfect finger food for little hands and a great way to sneak in some extra nutrients with veggies.
Q6: How should I serve these wraps?
A: Serve them straight off the skillet with a side of crunchy salad or zesty guacamole for a balanced meal. You can also slice them into pinwheels for a fun party appetizer or lunchbox surprise.
Q7: Can I make these ahead of time?
A: You can prepare the beef filling in advance and store it in the fridge.When ready,simply warm the filling and assemble your wraps fresh to keep the melted cheese magic alive.
Q8: any tips for the perfect wrap technique?
A: Sure! Lay the tortilla flat, pile your filling slightly off-center, fold the sides in, and roll tightly. For extra stability and meltiness, heat the wrapped wrap in a skillet for a minute or two on each side until golden brown.
Q9: Is this recipe suitable for meal prepping?
A: Definitely! Cook a batch of the beef filling and keep tortillas handy. Assemble your wraps the night before or morning of, then reheat quickly before eating to enjoy that fresh, melty magic anytime.Q10: Where does the “Melted Magic” name come from?
A: It’s the enchanting moment when you bite into a wrap and the cheese pulls away in luscious, stretchy strands while the savory beef bursts with flavor-pure melted magic!
The Conclusion
as the final bite of these cheesy beef wraps melts away, you’re left with more than just a satisfied appetite-you’ve uncovered a simple culinary secret that transforms everyday ingredients into a comforting, flavorful experience. Whether you’re looking to impress guests with minimal effort or crave a quick midweek meal, these wraps deliver a perfect balance of gooey cheese and savory beef wrapped in a warm embrace of tortillas. So next time hunger calls, remember: sometimes, the most magical meals come together with just a few easy steps and a love for melted cheese. Happy wrapping!