In an age where convenience frequently enough overshadows craft, there remains something irresistibly charming about bread baked the old-fashioned way. Rustic peasant bread, with it’s hearty crust and tender crumb, embodies a timeless homemade tradition that has nourished families for generations.This humble loaf, born from simple ingredients and patient hands, tells a story of heritage, resourcefulness, and the enduring art of slow bread-making.join us as we explore a rustic peasant bread recipe that invites you back to a slower pace-where every slice is a festivity of history, warmth, and the unmistakable comfort of home.
Rustic Peasant Bread Recipe is a heartfelt journey into the soul of traditional baking, where simple ingredients and time-honored techniques converge to create a loaf with a golden, crackly crust and a tender, open crumb. This artisanal bread, rooted in centuries of European rural kitchens, embodies the essence of home-cooked comfort and communal sharing. With every bite, you experience the heritage of humble farmers who relied on a handful of ingredients and the magic of fermentation to nourish their families.
Origins and Cultural Significance of Rustic Peasant Bread
This bread carries the legacy of rustic kitchens across France, Italy, and Eastern Europe, where wheat or rye flours were transformed into sustenance by working hands. Often baked in wood-fired ovens, these loaves were crafted to be both durable and delightful-ideal for dipping in stews, savoring with cheese, or spreading with fresh butter. The crusty exterior and chewy interior symbolize resilience and simplicity, making this bread a cultural bridge between generations.
Essential Ingredients for Authentic Flavor and Texture
- 3½ cups (420g) all-purpose flour, sifted for lightness
- 1½ teaspoons fine sea salt, to enhance flavor depth
- 1 teaspoon active dry yeast, gently awakened for a light rise
- 1½ cups (360ml) lukewarm water, to nurture fermentation
- Optional: 2 tablespoons whole wheat flour, for added rustic texture
step-by-Step Techniques for Perfectly Crusty Loaves
- Activate the yeast: In a large bowl, dissolve yeast in lukewarm water, letting it bloom for 5-10 minutes until frothy, signifying a lively starter.
- Mix the dough: Add flour and salt to the yeast mixture. Use a wooden spoon or your hands to combine until shaggy dough forms. Avoid overmixing; rustic bread embraces imperfections.
- First rise: Cover the bowl with a damp towel or plastic wrap and place in a warm spot. Allow dough to rise for 1 to 1½ hours, doubling in size and bubbling with air pockets.
- Shape the loaf: Lightly flour a clean surface and gently fold the dough onto itself a few times, forming a round boule. handle with care to keep the airy texture intact.
- Second rise: Place the shaped dough on parchment paper, cover with a kitchen towel, and let rest for 30-45 minutes until slightly puffed.
- preheat oven and prepare baking vessel: Position a Dutch oven or heavy casserole with lid inside the oven. Preheat to 450°F (230°C) for at least 30 minutes to retain radiant heat.
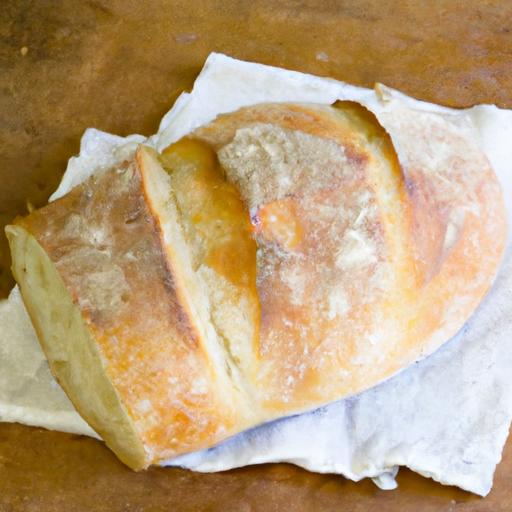
- Bake the bread: Carefully transfer the dough with parchment into the hot Dutch oven. Score the top with a sharp knife or lame to allow expansion. Cover and bake for 30 minutes, then remove lid and bake an additional 10-15 minutes until crust deepens to mahogany and crackles audibly.
- Cool the loaf: transfer bread to a wire rack for at least one hour. Cooling completes the cooking process and preserves crust integrity.
Tips for Adapting the Recipe to Modern kitchens and Schedules
- Overnight ferment: Mix ingredients before bed, refrigerate dough overnight, and bake fresh in the morning-ideal for busy lifestyles.
- No Dutch oven? Use a baking stone with a pan of water beneath to create steam, which fosters crusty exteriors.
- Flour variations: Substitute up to half of all-purpose flour with whole grain or spelt for richer flavor and nutrients.
- Speed tricks: For a faster rise, use warm (not hot) water and a slightly larger yeast amount, but expect less depth in flavor.
- Flavor boosts: Incorporate herbs like rosemary or oregano into the dough for aromatic nuances.
Prep and Cook Time
- Preparation: 15 minutes
- First rise: 1-1½ hours
- Second rise: 30-45 minutes
- Baking: 40-45 minutes
- Total Time: Approx. 3 hours (less if refrigerating overnight)
Yield
One rustic boule,serving about 8 slices or 6 hungry guests.
Difficulty Level
Medium – Perfect for bakers with some experience and a desire to nurture patience.
Ingredients
- 3½ cups (420g) all-purpose flour, sifted
- 1½ teaspoons fine sea salt
- 1 teaspoon active dry yeast
- 1½ cups (360ml) lukewarm water
- Optional: 2 tablespoons whole wheat flour
Instructions
- Activate yeast: Combine yeast and lukewarm water in a large bowl. Stir gently. Wait 5-10 minutes until frothy.
- Mix dough: stir in flour(s) and salt using a wooden spoon until no dry spots remain. Dough will appear rough and sticky.
- First rise: Cover bowl with damp cloth, leave in warm place to double (~1 hour).
- Shape loaf: Flour countertop.Turn dough out and fold edges into center. shape into a round boule with a light touch.
- Second rise: Place dough on parchment, cover, and let rest 30-45 minutes.
- Preheat oven and vessel: Set oven to 450°F (230°C). Place Dutch oven inside to heat.
- Bake: Place dough with parchment into Dutch oven. Score top. Cover and bake 30 minutes. Remove lid, bake 10-15 minutes more until crust dark brown and crisp.
- Cool and serve: Transfer to wire rack to cool at least 1 hour. Slice and enjoy fresh.
Chef’s Notes & Tips for Success
- Humidity & flour: Flour absorbs moisture differently-adjust water by a tablespoon if dough feels to stiff or wet.
- Crust perfection: For an extra crackly crust, spritz the oven walls with water just after placing the bread inside.
- Storage: Keep leftovers wrapped in cloth at room temperature for 2 days. Refresh by reheating in oven for 5 minutes.
- Flavor development: Longer fermentation in cooler temperatures deepens taste; consider cold-proofing dough overnight.
- substitutions: For gluten-free adaptations, explore blends designed for artisan bread but expect texture variations.
Serving Suggestions
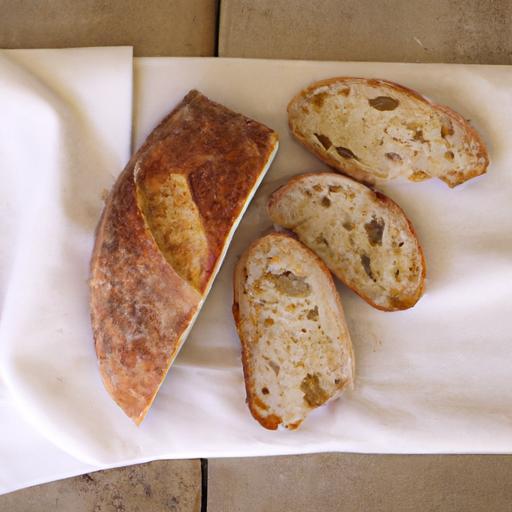
This rustic peasant bread dazzles when served warm alongside a velvety bowl of soup or ratatouille. For an inviting appetizer, slice thin and drizzle with high-quality olive oil and flaky sea salt. Fresh herb butter or sharp cheese are natural companions, accentuating the loaf’s subtle tang and chewy crumb. Garnish with rosemary sprigs or a dusting of whole wheat flour for a photogenic touch that invites savoring.
| Nutrient | per Serving (1 Slice) |
|---|---|
| Calories | 150 |
| Protein | 5g |
| Carbohydrates | 30g |
| Fat | 1g |

To explore more traditional bread baking techniques, check out our Sourdough Bread for Beginners article.For past context on rustic breads, Britannica’s Bread Overview offers excellent insight.
Q&A
Q&A: Rustic Peasant Bread Recipe – Timeless Homemade tradition
Q1: What makes rustic peasant bread so special compared to other bread types?
A1: Rustic peasant bread captures the essence of simplicity and tradition. Unlike highly processed commercial breads, it embraces a hearty crust and a chewy, open crumb that speaks to centuries-old baking techniques. Its charm lies in minimal ingredients-just flour, water, salt, and yeast-melding into a loaf that’s soul-warmingly authentic and satisfying.
Q2: Why is rustic peasant bread considered a “timeless” recipe?
A2: This bread has survived generations because it requires no fancy equipment, no complicated steps, and no rare ingredients. It’s a testament to the resourcefulness of rural bakers who transformed humble pantry staples into nourishment for families. its timelessness comes from its comforting aroma, adaptable nature, and the simple joy of baking something from scratch.
Q3: What kind of flour is best for making rustic peasant bread?
A3: Traditionally, a combination of bread flour and whole wheat flour works beautifully. Bread flour lends strength for a sturdy structure, while whole wheat adds earthy flavor and nutrition. Though, many bakers enjoy using just all-purpose flour for a lighter loaf or experimenting with rye or spelt to echo older, regional variations.
Q4: Is it necessary to use commercial yeast, or can natural fermentation be employed?
A4: Both paths lead to delicious bread. Commercial yeast speeds up the process and is beginner-friendly, while natural fermentation-or sourdough starter-adds depth, complexity, and a tangy note that rustic loaves have delighted in for centuries. Natural starters also improve digestibility and shelf-life, if you’re up for the rewarding patience it demands.
Q5: Can rustic peasant bread be made without a bread machine or fancy oven?
A5: Absolutely! Rustic bread is the epitome of no-fuss baking. It thrives on simplicity and can be made in any oven or even a Dutch oven on a stovetop. The signature crust frequently enough comes from baking in a hot, steamy environment-you can replicate steam by placing a pan of water in your oven or covering the dough with a heavy lid.
Q6: How long does the dough typically need to rise?
A6: Rustic peasant bread dough often undergoes a slower, longer rise-sometimes several hours or even overnight-to develop flavor and texture. This slow fermentation helps create those signature air pockets and a complex, slightly nutty taste. For a quicker bake, a couple of hours at room temperature can suffice, but the patience pays off.Q7: What should I listen for to know my rustic bread is perfectly baked?
A7: Tap the bottom of the loaf-it should sound hollow, a classic sign it’s baked through. The crust will be golden-brown, maybe with blistered spots, indicating a well-developed crust. Also, the aroma of toasty, warm bread filling your kitchen is an unmistakable cue that you’ve created something truly special.Q8: How can I store rustic peasant bread to keep it fresh?
A8: Because of its crusty nature, store your bread loosely wrapped in a clean cloth or paper bag at room temperature to maintain the crust’s crunch and avoid staling quickly. Avoid airtight plastic bags, which trap moisture and soften the crust. If needed,freeze portions in sealed bags-then refresh in the oven when ready to enjoy.
Q9: What are some delicious ways to enjoy rustic peasant bread at home?
A9: The possibilities are endless! Toast slices and slather with butter and honey, use it as a base for a hearty bruschetta, dip into vibrant olive oil blends, or serve alongside soups and stews for a comforting meal. Rustic peasant bread’s chewy crumb and robust crust make every bite a journey back to simpler times.
Q10: Why should modern bakers embrace making rustic peasant bread?
A10: In a world that often rushes through food and convenience, baking rustic peasant bread reconnects us with heritage, patience, and craft. It’s therapeutic, grounding, and deeply rewarding to transform a few ingredients into a loaf that tells a story. By baking this timeless tradition, you become part of a lineage of hands-on creators savoring the art of homemade bread.
Closing Remarks
As the aroma of this rustic peasant bread fills your kitchen, you’re not just baking-you’re connecting with a timeless tradition that has nourished generations. This simple, hearty loaf embodies the essence of homemade comfort, crafted from humble ingredients yet rich in history and flavor. Whether enjoyed fresh from the oven or as a base for your favorite spreads, this bread invites you to slow down and savor the art of baking as it was meant to be: honest, grounding, and utterly satisfying.So,roll up your sleeves,embrace the rhythm of dough and flour,and carry forward a tradition that is as enduring as the bread itself.